
How to Create a Restaurant Menu in WordPress with JelloPoint

Learn how to create a restaurant menu in WordPress with JelloPoint. Create your first menu, organise dishes into sections and display it on an Elementor page.

On This Page

How JelloPoint organises your menu

JelloPoint Restauarant Menu separates your menu content from its presentation. Create the content in WordPress, then use the Elementor widget to choose how it looks on your website.

  • Menu: a complete collection, such as Lunch, Dinner or Drinks.
  • Section: a group inside a menu, such as Starters, Mains or Desserts.
  • Menu item: an individual dish or drink, with its description, price and optional dietary badges.

For your first menu, start with one menu, one section and two or three dishes. You can expand it after checking the result.

Install and activate the plugins

If JelloPoint is already active, continue to the next step.

  1. In WordPress, open Plugins → Add Plugin → Upload Plugin.
  2. Choose the JelloPoint plugin ZIP file you downloaded, click Install Now, then activate it.
  3. Install and activate Elementor if it is not already active. Elementor is needed to display your restaurant menu with the widget.
  4. Confirm that JelloPoint appears in the WordPress administration menu.

If you are installing the Pro edition, follow the license activation screen for your purchase. If WordPress cannot install the ZIP, check that you selected the plugin package rather than a folder containing several downloads.

Create a menu

  1. Open JelloPoint → Menus.
  2. Under Add Menu, enter a clear name, such as Dinner Menu.
  3. Add a description if you want one. You can choose whether to display it later in Elementor.
  4. For a regular menu, leave Daily Menu unchecked if that option is available.
  5. Click Add Menu.

This creates the menu collection. It does not yet add dishes or create the website page.

Add your first section

  1. Open JelloPoint → Menu Builder.
  2. Choose your menu in Select Menu.
  3. Under Create New Section, enter a name such as Starters.
  4. Click Create and Add Section.
  5. Click Save Structure to save the arrangement.

Repeat for Mains, Desserts or other groups. Use Choose Existing Section → Add Existing Section when you want to reuse a section that already exists.

Create and assign menu items

  1. Open JelloPoint → Menu Items → Add Menu Item.
  2. Enter the dish or drink name in the title field.
  3. Write a short description in Description.
  4. In Pricing, enter a single price. If a Price Mode choice is shown, choose Single Price for this first example.
  5. Select any relevant Dietary Badges.
  6. In Menu assignments, find your menu and choose the section that should contain the item.
  7. Keep Show this item on the site enabled under Visibility.
  8. Publish the item. Use Update when editing an existing item.

Repeat for the other dishes. An item can appear in more than one menu, with one section chosen for each menu.

Arrange the menu

Return to Menu Builder, select your menu and click Refresh if you created items in another tab. Check that each item appears in the intended section.

You can also place unassigned items from the builder: choose a Target Section, tick the items in Unassigned Items and click Add selected to Section.

Drag sections and items into the order you want, then click Save Structure. To make a subsection, drag a section slightly to the right; drag it left to return it to the higher level.
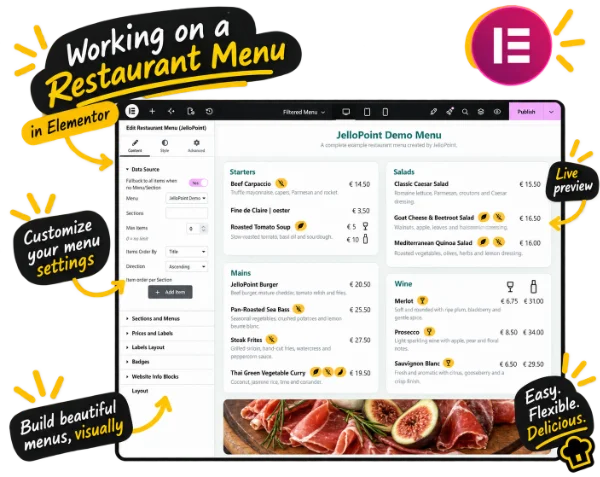
Display the menu in Elementor

  1. Create or open the WordPress page where the menu should appear and choose Edit with Elementor.
  2. Search the widget panel for Restaurant Menu (JelloPoint) and drag the widget into a container.
  3. Open Data Source and select the menu you created in Menu.
  4. Leave Sections unfiltered initially so you can check the complete menu. Leave Max Items at 0 for no limit.
  5. To use the saved item order, choose Order (menu order) under Items Order By, with Ascending direction.
  6. Under Sections and Menus, choose whether to show the menu title, menu description and section names.
  7. Adjust Prices and Labels, Labels Layout and Layout as needed. Start with a simple layout before making section-specific changes.
  8. Publish or update the Elementor page.
Editing a JelloPoint restaurant menu in Elementor
JelloPoint’s Restaurant Menu widget in Elementor. Select the image to enlarge it.

Check the result and keep it updated

Open the published page and check the title, item order, descriptions, prices and badges. Use Elementor’s tablet and mobile previews, and check the page on a phone if possible. Confirm that long names and prices remain easy to read.

For future content changes, edit the item under JelloPoint → Menu Items and save it. For arrangement changes, use Menu Builder and Save Structure. For appearance changes, edit the Elementor widget.

If something is missing or looks different from your preview, use the Troubleshooting guide next.

Tip

Choose the Menu explicitly in the Elementor widget. When no menu or section is selected, the fallback option can display items from across your site.